Furnace installation can seem intimidating, especially when working on gas piping. But with a little effort, you can save money and achieve a comfortable living environment for your family.
Before beginning any work, it’s important to clear the area and turn off the power supply to avoid accidents or injuries. Next, check that the ductwork is properly insulated.
Whether you are replacing your old furnace or just upgrading to a new one, the first step is to remove the old appliance from the site. It is important to do this properly as improper disposal can result in environmental hazards and even fines. This can be done by contacting your local waste management department and following their instructions for handling the container and oil that may be present in your old furnace.
During the removal process, it is a good idea to clear out the area surrounding the old furnace. This can help protect your belongings and allow the technicians to work safely and efficiently. It will also ensure that no debris is in the way when the new furnace is being installed.
Once the old furnace is removed, the ductwork can be connected to the new unit. This is a job best left to an experienced professional, as mistakes could lead to inefficient heating or even unsafe conditions.
It is also important to check with your local laws and regulations regarding furnace installation and disposal. Different areas may have different requirements regarding safety standards, permits, and certifications for the proper installation of a furnace. Contacting an HVAC company familiar with local rules and regulations will ensure that your new furnace is up to code and can function properly.
If you notice any unusual sounds coming from your old furnace, it is a good idea to consult with a professional to see if it is nearing the end of its lifespan and should be replaced. Unusual noises can be a sign of several issues, including problems with electrical connections, gas lines, or condensate drains.
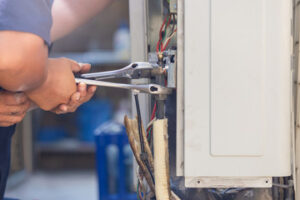
If you are considering a DIY furnace installation, it is important to have the right tools for the job. A power drill with a suitable bit is helpful for disassembling the old unit. A wrench is also a must-have to disconnect the propane line. It is important to disconnect all of the gas and electricity lines, so that no dangerous materials can accidentally be exposed during the disassembly process.
Install the New Furnace
Once the old furnace has been removed, your installation team will start by making sure the new unit is properly set up. This includes connecting the ductwork and supply lines to facilitate optimum airflow. This step can take a long time and requires careful consideration. It’s important that the plenum and ductwork are sized appropriately for your home; if not, you’ll suffer from inefficient airflow and poor heating performance.
It’s essential to choose a reputable installation service with years of experience in furnace installations. Read customer reviews and check out references before hiring a company to handle your installation. A good installation service should also have a detailed process for handling furnace replacements and installation.
They should start by assessing your home’s needs and doing a load calculation. This will help them determine what size and type of furnace is best suited to your home. It will also include a review of your property’s energy requirements and insulation. They’ll then provide you with a quote and help you schedule the replacement or installation date.
You’ll need to clear the space around your home for this work. It’s best to remove any furniture or other objects that could get in the way of your technician as they work. This will ensure they have a clear path to bring in the new furnace, making it safer and more efficient for everyone involved.
Next, you’ll need to make a supply list for your furnace. This will generally include things like a metal box for the return air duct and the supply air duct. It’s a good idea to consult the instruction manual for your furnace for a complete list of supplies. You’ll probably need tin snips, sheet metal screws, a screwdriver with a 1/4″ hex bit, wire connectors, cable ties, a cordless drill with a 1/4″ hex bit, and pipe dope.
You’ll also need to connect PVC pipes for the inlet and exhaust. This will keep water from backing up around your furnace and prevent flooding in your basement. You’ll need to slightly slope the pipes so that any condensation will drain away from the furnace.
Check the Gas Lines and Electrical Connections
Whether your furnace is gas or electric, it needs to be properly connected to the power supply and to your home’s ducting system to distribute heated air throughout your house. A professional can help you connect the electrical supply and establish proper ducting. This will ensure that the unit functions efficiently and effectively.
After completing the ducting system connection and vent pipe installation, your technician will perform various tests to make sure the system is functioning properly. This will include assessing the integrity of the duct joints, ensuring that they are sealed properly and not leaking, as well as checking the gas line connection. It is crucial to inspect these connections regularly, as leaks can cause serious issues with the system and lead to costly repairs.
In addition, a professional can also inspect the ventilation system for signs of corrosion or moisture buildup. These issues can result in decreased airflow and inefficient heating. It is also important to evaluate the drain lines, ensuring that they are not blocked or obstructed. If there is a problem, it may be necessary to install a condensate drain pump to reduce water buildup and minimize damage.
A qualified HVAC professional can also verify that the gas line connection is secure and leak-free. They can use tools such as a pipe wrench to tighten or loosen fittings, minimizing the risk of gas leaks and other problems. They will also verify that the shut-off valve is in a safe location and accessible, as well as check the status of the sediment trap and other components.
The electrical connections for a furnace must be properly made, according to local and national codes. It is also important to determine the minimum circuit ampacity of the service panel and switch wiring box so that the system can operate safely. This will ensure that the system can operate without affecting other systems in your home, such as appliances or lighting.
After completing these steps, it is time to test the furnace and make any adjustments. They can run the system through a heating cycle to ensure that it is operating correctly, and they will check for any unusual noises or smells. Once they are satisfied that the system is working properly, they can turn on the power.
Test the System
It’s a good idea to run a series of tests before firing up the furnace for the first time. This will ensure that everything is working properly and pointing in the right direction for optimal performance. It’s also a great opportunity to identify any potential issues before they become major problems.
Start by turning on the power supply. Locate the power switch on your basement stairs or in the breaker box, and turn it to the “on” position. Check to make sure that the switch has not been accidentally turned off, and that all access doors and panels have been closed.
Next, check the thermostat settings to make sure they are set to heat. It’s easy for a thermostat to be mistakenly switched to cool, so it is important to check its setting before proceeding. You should also test the furnace’s limit switch to see if it is functioning properly. This can be done by using a multimeter to test for continuity and by applying heat (such as with a hairdryer or heat gun) to the limit switch to see how it responds.
Lastly, it’s a good idea to connect the condensate drain line to the bottom of your furnace and route it towards an appropriate drainage point. This helps to prevent water buildup that can damage your furnace and lead to inefficient operation.
Once all of these steps are complete, it’s time to fire up the furnace and see how it works. Be careful when doing so, and follow all safety precautions. Once the system is running smoothly, it’s time to enjoy your cozy, warm home!
If you aren’t comfortable performing any of these tasks, it’s always best to call a professional. They can help you to troubleshoot and resolve any issues quickly and easily. A qualified technician can also help you maintain your furnace and keep it operating at its peak performance. Regular cleaning, lubricating, and inspection of all furnace components can minimize malfunctions and improve energy efficiency. They can also detect early signs of wear and tear, such as cracks in the heat exchanger that can release harmful carbon monoxide into your home.